
Understanding How Decks are Built
Decks come in all shapes and sizes, but all decks have the same basic framing components. Here is a summary of how decks are built, and the names and locations of each deck framing component, starting at the bottom:
- Concrete footings or piers are the foundation of a deck. They’re poured in excavated holes under the local frost line.
- Wooden posts are attached to the concrete footings. Some decks are built closer to the ground with beams connected directly to the concrete piers. Any lumber buried underground must be below-grade pressure treated. All other lumber used to frame your deck must be pressure treated.
- Decks are either freestanding (not attached to your home) or ledgered (attached to your home with the use of a ledger). Ledgers are boards bolted to your home’s rim joist. Ledgers are usually made with a 2″ x 8″ or 2″ x 10″ board. An improper ledger attachment is the #1 cause for deck failures.
- Beams are large framing members, often 3″ wide by 8″ or 10″ deep, sitting on and connected to the tops of the posts. They carry the weight of the joists.
- Joists run perpendicular to the beams and rest on and are connected to the tops of the beams. They are usually made with 2″ x 8″ or 2″ x 10″ boards.
- Lateral braces are framing members attaching posts to beams at a 45 degree angle, preventing the deck from moving side to side.
- Decking boards are the planks you actually walk on. Decking runs either perpendicular or at a 45° angle to the joists. Decking should always be screwed in at each joist intersection, attaching the decking to the framing below. If your framing structure is sound but your boards are warping, rotting, or are nailed down, replacing just your decking boards is a great money savings alternative to replacing your entire deck.
- Staircases, lighting, pergolas, railings, and banisters (spindles) are the final components of a deck. Stair stringers are the large, notched pieces under the stair treads.
Common sense can often give you a good idea of how well your deck is aging. If the deck sways or shakes while you walk on it, obviously, this is a bad sign. However, some signs of aging are harder to detect, and a closer look at the structure by a licensed contractor may reveal problems in the making.
Helpful Tools To Inspect Your Own Deck
The only two tools you really need for inspecting your deck are a strong flashlight and an awl. If you don’t have an awl, a small screwdriver will do the same job.
Other helpful tools for deck inspection are:
- A 3′ level
- Tape measure
- 20-foot piece of string
- Small handheld shovel
- Camera phone (if you’re in the SE Michigan area, email us pictures of your deck to info@CustomDeckCreations.com and we’ll let you know what we think)
Inspecting Underneath Your Deck
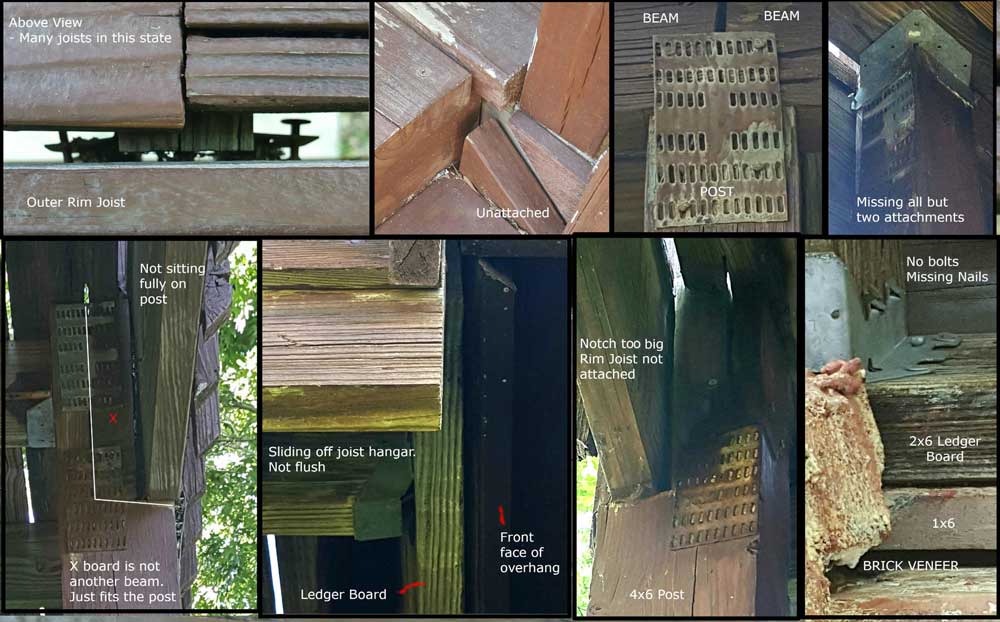
The ledger should be attached to the house with lag screws or hex bolts, so have a close look at the surface of the ledger and determine whether this type of hardware was used. A few nails may have been used to temporarily hold a ledger in place while constructing your deck, but bolts should always be present on your deck’s ledger board. If your ledger is attached only with nails, do not use your deck again until a licensed deck builder inspects your deck. This is a major structural problem with impending catastrophic deck failure.
Examine the ledger carefully for signs of rot, mold, or fungus growth. If any areas look bad, use the awl or slender screwdriver and see how far you can press the tip into the wood. If it goes in easily more than ¼ to ½ inch, this is a sign of rot. Use the awl for checking any other suspicious areas of the deck, as well.
Beams under a deck should not bow, and if they do, this is a sign they are beginning to fail. Bowing beams indicate the beam is inadequately sized for the weight of the deck. Visually examine the bottom edge of beams for signs of bowing. You can also pull a string between the lower corners at each end of the beam to check for bowing.
Deck beams should also rest on top of posts, not attached to the sides of posts. Beams attached to the sides of posts mean the entire weight of the deck structure, and any furniture and people on top of the deck are completely resting on the bolts used to attach those beams to the posts. Attaching beams to the sides of posts used to be code, but any new decks built now must have the beams rest on top of the posts. If your beams are attached to the sides of your posts, we suggest a licensed contractor inspect the integrity of such a connection.
If your deck is more than three feet off of the ground, there should be lateral bracing at each post/beam connection (except for posts closest to your home for ledgered decks only). Bracing prevents side-to-side shifting of the deck structure in wind or if there are a lot of people on your deck moving around. Check how securely lateral bracing is attached at the posts and beams.
Joists should be spaced every 16″. Joists spaced farther than 16″ (i.e. 24″) was once code-approved. If your decking boards are each still securely screwed in at each joist/board intersection, you’re likely ok here. However, know that joists spaced farther than 16″ will result in a premature life of your decking boards.
Inspecting the Upper Area of Your Deck
Walk around carefully on the surface of your deck and check for decking which is spongy or poorly attached to the joists. Also, check for the splintering of wood, and use the awl for determining if the decking is rotten.
You may notice nail heads that are sitting up above the decking, try to hammer these back in to prevent cutting your feet on them. It may also be possible for nails or screws to appear flush with the decking but work loose below from a rotten joist. Look out for boards that are warped or splitting as well. It is possible to replace single decking boards, though the matching color will be the hardest part. If any decking moves away from the joist or gives out under your weight when you walk on it, it is overdue for repairs.
As you examine the decking, check how well the deck sealer, paint, or finish is holding up (if your decking is wood). The finish on wood decking is important for preventing rot and splintering of the wood. If you are lucky enough to have composite decking, such as Trex, Timbertech, Azek, or others, your deck does not ever need an application of sealer, paint, or other finish. Woo hoo!
Railings are vital for preventing people and pets from falling off of a deck. Unfortunately, railings are a frequent problem area on older decks. Carefully test the railings and see if they move to any significant degree when you shake them.
Look for missing railing slats/balusters/spindles, and measure the distance between them. There should not be 4″ or more space between them. If slats are spaced farther apart, they pose a hazard for children who can get their head stuck in them, or fall through them. In Michigan, any deck higher than 30″ off the ground is required by law to have railings (for safety purposes, we suggest any deck higher than 9″ off the ground should have railings).
Carefully walk up and down all staircases and test for any give-in stair treads. The riser space at the back of each stair should be completed with a stair riser board, but if not, no gap 4″ or larger should exist.
Stair handrails should be no more than 1 ½ inch in diameter and should be easy to grab, typically round. Sometimes, deck staircases have 2″ x 4″ cocktail railings (which we love!), and should be complemented with a grip-able round handrail. Examine the hardware attaching handrails to posts. Fasteners should be tight and secure.
Look at the underneath of stairs, checking for rotting stair stringers and gaps between the top of the stringer where it might be pulling away from the deck. Stairs are often installed improperly.
Getting Your Deck Professionally Inspected
Decks can be enjoyed for decades if properly maintained. If you have an older deck, or just moved into a new home, have your deck inspected by a licensed deck builder at the five years mark, and every year once it is over 10 years old.
If you are in the Greater Detroit Metro Area, Custom Deck Creations can provide a professional deck inspection! Contact us today and schedule an appointment.